Create Application Metadata Intelligence for Physical Environment
Create an Application Metadata Intelligence session in GigaVUE‑FM by selecting the applications available from the Total Applications displayed on the Application Intelligence (AMI) dashboard.
To create an Application Metadata Intelligence session, follow these steps:
| 1. | From the left navigation pane, go to Traffic >Solutions>App Intelligence. . |
| 2. | In the Application Intelligence Session , click Application Metadata. |
You must configure Application Intelligence session, to monitor the application on the network and to display them on the Total Applications. To create Application Intelligence session refer to Application Intelligence Session. In the created session, click Edit to configure Application Filtering, De‑duplication, and Application Metadata Intelligence. For each operation, click App Editor to open the Applications Editor page, where you can select the required application families and application tags. For details on mapping Legacy NetFlow (Gen2) application attributes to AMI application attributes, see Reference: Legacy NetFlow to AMI application attributes Mapping.
| 3. | From the navigation pane, click App Intelligence. Select the applications from the Total Applications in the right pane of the Application Intelligence dashboard. |
| 4. | Click Operations and select App Metadata from the drop-down list. |
You can view the list of applications selected in the Selected Applications section.
Application Metadata Intelligence generates up to 6000 attributes for over 4000 applications without impacting the users, devices, applications, or the network appliances. The feature identifies applications even when the traffic is encrypted.
| 5. | Expand the application and select the attributes to be extracted. |
Note: Flow Direction/Behaviour under Application Metadata Settings must be configured as Bidirectional for exporting application Metadata. Each exporter can be configured to export application metadata for up to 256 applications, and up to 64 attributes can be exported for each application. GigaVUE‑FM allows selecting metadata for applications that support exporting metadata. Applications which do not support exporting metadata are not listed in the GigaVUE‑FM. By default, application name is exported for all such applications.
Note: The attributes, IP source and IP destination, cannot be selected from the App Editor. They are exported by default. Navigate to Advanced Settings > Collects section to view the default attributes that will be exported.
| 6. | In the Destination Traffic section, you can attach up to five exporters to an AMI session. You can only create a maximum of 5 exporters. Enter the following details: |
|
Option |
Mandatory |
Default |
Description |
||||||
|---|---|---|---|---|---|---|---|---|---|
|
Tool Name |
Yes |
|
Configures the alias name for the tool. |
||||||
|
IP Interface |
Yes |
|
Configures the IP interface on the Gigamon device that connects to the tool. |
||||||
|
Tool IP Address |
Yes |
|
Configures the destination IP address for exporting the records. |
||||||
|
Template |
No |
|
Configures pre-defined tool templates for exporting metadata. Tool templates are user configurable. Ex. SplunkMetadataTemplate, SecurityPostureTemplate etc. |
||||||
|
L4 Source Port |
Yes |
|
Configures the Source Port of the IP interface on the Gigamon device. |
||||||
|
L4 Destination Port |
Yes |
|
Configures the destination port on the tools side. |
||||||
|
Application ID |
No |
Disabled |
Configures exporting Application Name for all applications identified by the DPI engine. Note: Requires AMI/SVP/ZTA license. |
||||||
|
Application List |
No |
|
Each exporter can be customized to export metadata for certain applications/ protocols. |
||||||
|
Format |
Yes |
|
Options: NetFlow, CEF Configures the format for exporting the records. |
||||||
|
Version |
Yes |
IPFIX |
Options: v5, v9 and IPFIX. Configures the version of NetFlow for exporting the records. |
||||||
|
Template Refresh Interval |
Yes |
60s |
Range: 1-216000s Configures the interval at which the template record is exported while exporting the IPFIX records. Changing the refresh interval can impact ingesting the records on the tools side. Please seek guidance from your tool’s vendor before changing the default. |
||||||
|
Record Type |
Yes |
Cohesive/ Segregated |
Default depends on the Flow Behavior configuration.
If record size exceeds the IP interface MTU, the records will be exported as fragments. |
||||||
|
Active Timeout
|
Yes
|
60s
|
Range: 1-604800s . This option configures the timeout interval for exporting interim records for such flows. Shorter timeouts increase the no. of records and longer timeouts result in fewer records. Longer timeouts can also increase the record size. Please seek expert guidance from Gigamon and tool vendor before changing the default. |
||||||
|
Inactive Timeout |
Yes |
15s |
Range: 1-604800s Configures the timeout interval for marking flows as inactive and exporting their records soon after. Inactive timeout constitutes idle time after receiving the last packet. Shorter timeouts can prematurely deem a flow as inactive and subsequent packets would be considered as a new flow that can skew the analytics on the tools side. Please seek expert guidance from Gigamon and tool vendor before changing the default. |
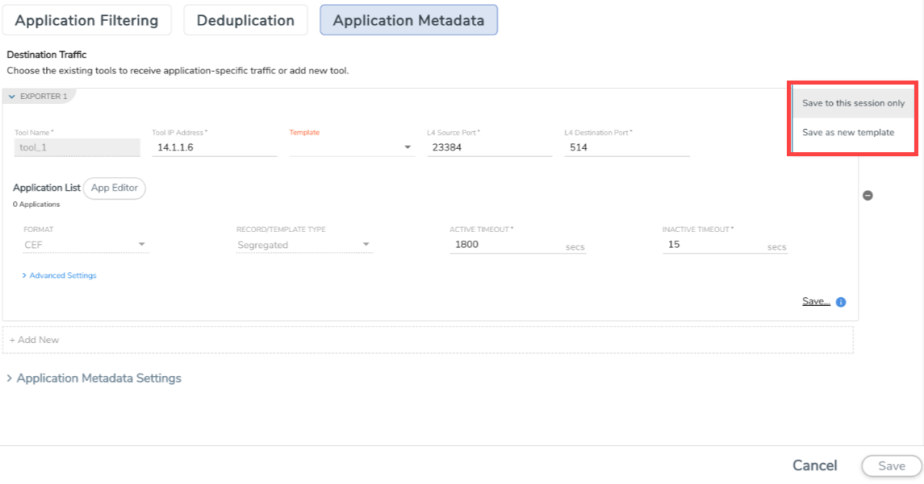
7. When editing the exporter template, if you change any of the non-editable fields (Format, Record Type, NetFlow Version), the solution fails.
Note: When you create a session with flow-behaviour as bi-directional, GigaVUE‑FM allows you to select Netflow v5 and v9 templates. When you edit the same session, you cannot select the Netflow v5, and v9 templates.
Note: If the export format is CEF, the default value for L4 destination port is 514. If the export format is NetFlow, the default value for L4 destination port is 2055.
Note: The format and the record/template type get selected automatically, after selecting the Tool Template.
| 8. | In the Advanced Settings > Collects section, you can select the following packet attributes: |
| Counter - Select the Bytes, and Packets. |
| IPv4 - Select the required attributes. By default, Source Address, Destination Address, and Protocol are enabled. |
| IPv6 - Select the required attributes. By default, Source Address, Destination Address, and Next Header are enabled. |
| Transport -Select the required attributes. By default, Source Port, Destination Port are enabled. |
By default, the above collect types are displayed. Click  to add the following collect types:
| Data Link - Select any one of the parameters such as Source Mac, Destination Mac and VLAN. |
| Timestamp - Select the required timestamp such as System Uptime First, Flow Start, System Uptime Last, and Flow End. |
| Flow - Select the parameter as End Reason if required. |
| Interface - These options are supported only in standalone deployments (GigaVUE-HC1, GigaVUE-HC3, GigaVUE-HCT, and GigaVUE-HC1P) and legacy cluster deployments. Select any one of the following parameters. |
Note: when Input/Output Physical interface width is set to 2B, only the lower order bytes of the interface index are exported.
| • | Input Physical - Select the Input Physical checkbox to export the ingress interface as one of the fields sent in the NetFlow record. It also allows exporting the interface index in the NetFlow record. Under Input Physical Width, choose 2 bytes or 4 bytes. A width of 4 bytes is recommended for both v9 and IPFIX protocols, while v5 supports only 2 bytes. CEF supports exporting the Input interface index with a width of 2B (default) or 4B. |
| • | Output Physical - Select the Output Physical checkbox to export the egress interface as one of the fields sent in the NetFlow record. It also allows exporting the interface index in the NetFlow record. Under Output Physical Width, choose 2 bytes or 4 bytes. A width of 4 bytes is recommended for both v9 and IPFIX protocols, while v5 supports only 2 bytes. CEF supports exporting the Output interface index with a width of 2B (default) or 4B. |
| • | Input Name - Select the Input Name checkbox to export the interface name. In the Input Name Width field, specify a value between 1 and 32 bytes. The default value is 16 bytes. The total character limit for the interface name is 128 characters. |
| 9. | In the ApplicationMetadata Settings section:
|
||||||||||||||||||||||||||||||||||||||||||||||||||||||||||||||||||||||||||||||||||||||||||||||||
| You can enable or disable the Advance Hash option to perform the following: |
| • | Enable — Configures metadata cache advance-hash for encapsulated flows . This feature improves the efficiency of scheduling the distribution of encapsulated flows. It also improves the distribution of flows in service provider deployment cases. By default, when a new cache is created, advance hash is enabled. When upgraded from an older release, the advance hash is enabled. |
| • | Disable — Disables the metadata cache advance-hash for flows. |
| 10. | In the SelectedApplications section, select Export and click Export To for the applications that needs to be exported to the destination tool. |
| 11. | Click Save. |
Reference: Legacy NetFlow to AMI application attributes Mapping
When migrating Legacy NetFlow (Gen2) IPFIX application attributes to AMI, use the following table to identify the corresponding AMI attributes.
|
Protocol |
Legacy Netflow Attribute ( Gen 2 ) |
AMI Attribute ( Gen 3) |
|---|---|---|
|
HTTP |
URL |
uri_raw_path |
|
HTTP Response Code |
code |
|
|
User Agent |
user_agent |
|
|
Host |
host |
|
|
Method |
method |
|
|
Version |
version |
|
|
SSL |
Certificate Issuer Common Name |
certificate_issuer_cn |
|
Certificate Subject Common Name |
common_name |
|
|
Certificate Issuer |
certificate_dn_issuer |
|
|
Certificate Subject |
certificate_subject_cn |
|
|
Certificate Valid Not Before |
validity_not_before |
|
|
Certificate Valid Not Before Text |
Not applicable; this attribute is exported in ID format by "validity_not_before" |
|
|
Certificate Valid Not After |
validity_not_after |
|
|
Certificate Valid Not After Text |
Not applicable; this attribute is exported in ID format by "validity_not_after" |
|
|
Certificate Serial Number |
Not applicable; this attribute is exported in ID format by "serial_number" |
|
|
Certificate Serial Number Text |
serial_number |
|
|
Certificate Subject Algorithm |
Not applicable; this attribute is exported in text format by "certificate_subject_key_algo_oid" |
|
|
Certificate Subject Algorithm Text |
certificate_subject_key_algo_oid |
|
|
Certificate Subject Key Size |
certificate_subject_key_size |
|
|
Certificate Subject Alternative Name |
subject_alt_name |
|
|
Server Name Indication |
server_name |
|
|
Server Version |
server_hello_version |
|
|
Server Version Text |
Not applicable; this attribute is exported in ID format by "server_hello_version" |
|
|
Server Cipher |
cipher_suite_id |
|
|
Server Cipher Text |
Not applicable; this attribute is exported in ID format by "cipher_suite_id" |
|
|
Server Compression Method |
compression_method |
|
|
Server Session ID |
session_id |
|
|
DNS |
Additional Name |
name |
|
Additional Type |
Not applicable; this attribute is exported in text format by "host_type" |
|
|
Additional Type Text |
host_type |
|
|
Additional Class |
host_class |
|
|
Additional Class Text |
Not applicable; this attribute is exported in ID format by "host_class" |
|
|
Additional TTL |
ttl |
|
|
Additional RData |
host |
|
|
Additional RData Length |
rdlength |
|
|
AN Count |
ancount |
|
|
AR Count |
arcount |
|
|
Authority Name |
name |
|
|
Authority Type |
Not applicable; this attribute is exported in text format by "host_type" |
|
|
Authority Type Text |
host_type |
|
|
Authority Class |
host_class |
|
|
Authority Class Text |
Not applicable; this attribute is exported in ID format by "host_class" |
|
|
Authority TTL |
ttl |
|
|
Authority RData |
host |
|
|
Authority RData Length |
rdlength |
|
|
Bits Count |
not supported |
|
|
Identifier |
transaction_id |
|
|
NS Count |
nscount |
|
|
Op Code |
opcode |
|
|
Qd Count |
qdcount |
|
|
Query Class |
class |
|
|
Query Class Text |
Not applicable; this attribute is exported in ID format by "class" |
|
|
Query Name |
query |
|
|
Query Type |
query_type |
|
|
Query Type Text |
Not applicable; this attribute is exported in ID format by "query_type" |
|
|
Response Class |
host_class |
|
|
Response Class Text |
Not applicable; this attribute is exported in ID format by "host_class" |
|
|
Response Name |
name |
|
|
Response Type |
host_type |
|
|
Response Type Text |
Not applicable; this attribute is exported in ID format by "host_type" |
|
|
Response IPv4 Address Text |
Not applicable; this attribute is exported in ID format by "host_addr" |
|
|
Response RData |
host |
|
|
Response RData Length |
rdlength |
|
|
Response TTL |
ttl |
|
|
Response IPv4 Address |
host_addr |
|
|
Response IPv6 Address |
host_addr6 |
|
|
Response IPv6 Address Text |
Not applicable; this attribute is exported in ID format by "host_addr6" |


